

heute zeige ich euch meine kleinen Elefanten, die ich gemacht habe. Die Idee kam mir allerdings schon letztes Jahr, als ich die Sweet Scallops Tasche von Kate von Sew Kate Sew gemacht hab. Davon hatte ich echt süßen Elefantenstoff übrig und da nicht mehr viel übrig war, habe ich darüber nachgedacht, was ich noch damit machen könnte. Und was ist wohl besser, als aus Elefantenstoff einen Elefanten zu machen?
Und jetzt - Monate später - hab ich es tatsächlich geschafft einen Elefanten daraus zu machen. Ich hab mein eigens Schnittmuster gemacht, obwohl ich diese süßen Elefanten von Jess von Craftiness Is Not Optional gefunden habe. Ich wollte aber, dass meine Elefanten nicht ganz so dünn sind. Macht mich das zu einer seltsamen Person? Eeeeegal, hier is meine kleine Herde bilingualer Elefanten:

Und ich möchte euch zeigen, wie ich die gemacht habe.
Was man so alles braucht:
- Stoff (so ungefähr 25cm sollten ausreichen)
- Stoff der dazu passt (da reicht ein kleiner Rest)
- zwei Knöpfe oder Stickgar (für die Augen)
- Bastelwatte
- Nähsachen (also Faden, Nähmsachine, Stecknadeln, etc.)
- Bügeleisen und -brett
- "Schnittmuster" (hier)

Die Elefanten gucken also in entgegengesetzte Richtungen, das ist sehr wichtig. Wenn man mit den Auschneiden fertig ist, sollte man dann zwei Elefanten-Teile und 4 Ohr-Teile haben.

2. Dann bügelt man die grade Kante der Ohren ca. 7mm um.

Das Tonpapier hilft einem dabei. Da gibt es eine Linie bei 7mm und dann muss man einfach nur noch die Stoffkante auf die Linie legen und darüber bügeln. Das ist ein ziemlich weit verbreiteter Trick. Leider weiß ich nicht mehr, wo ich ihn zum ersten Mal gesehen habe.
Mit den rechten Seiten aufeinander, hab ich die zwei Ohren-Teile (zwei verschiedene Stoffe) so mit Stecknadeln befestigt, dass die obere Kante ganz genau aufeinander liegt.

Ich weiß, dass das auf dem Bild nicht so aussieht, aber die Kanten liegen tatsächlich aufeinander. Ich habe mehrere Photos davon gemacht und auf allen siehts nicht so aus. Ich weiß nicht woran das liegt, außer vielleicht, dass ich keine Ahnung von Photographie habe.
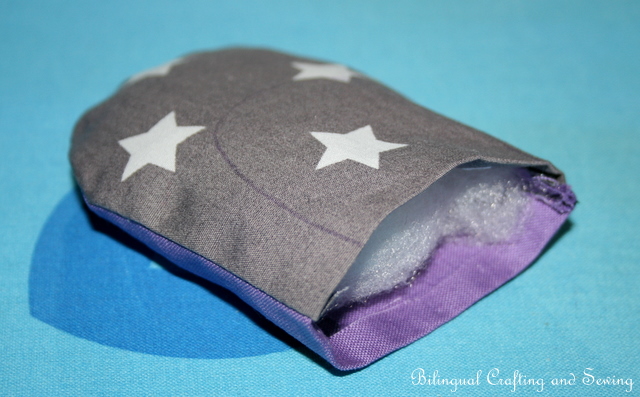
3. So jetzt näht man um die runde Kurve herum und schneidet dann mit einer Stoff-ZickZack Schere drumherum oder macht schneidet kleine Dreieck drumherum.

Ich hab das nicht nur gemacht, damit, wenn ich das Ohr umdrehe, es schön aufeinander liegen kann, sondern auch damit der Stoff sich nicht so stark aufribbelt. Dann einfach umdrehen, bügeln und mit der Bastelwatte füllen. Nicht zu sehr und die Füllung darf auch nicht bis ganz zum Rand gehen, sondern 1-2cm rein gedrückt sein.
3. Nun wieder die geraden Seiten des Ohrs direkt aufeinander fest stecken und das kleine Ohrschnittmuster-Teil auf das Ohr legen. Dann ein fach drumherum markieren. Dazu bitte Kreide oder einen von diesen lilafarbenen Stiften benutzen, die wieder verschwinden. Ich hab einen, der hat auf der anderen Seite einen weißes Ende mit dem man die Linie wieder wegmachen kann. Ähnlich wie bei einem Tintenkiller. Man kann aber auch einfach nach Gefühl gehen. Bei den ersten Versuchen mit billigem weißen Stoff, habe ich das so gemacht und das hat auch funktioniert. Super Alternative, wenn man keinen Stift hat oder sich nicht sicher ist, dass das auch wieder weggeht. Dann näht man an der Linie entlang. Das untere Ende bleibt aber offen. Das wiederholt man dann mit dem nächsten auch noch.

4. Nun nimmt man das ausgeschnittene Elefantenteil und markiert die schwarze Linie auf dem "Schnittmuster".

Man muss auch nicht die ganze Linie aufzeichnen. Ein Stückchen genügt.

5. Die Ohren werden dann auf den Elefanten gesteckt. Man kann sich aussuchen, welches Ohr man für welche Seite nimmt. Wenn man nämlich genau hinschaut, merkt man, dass bei den Ohren die eine runde Seite runder ist, als die andere. Ich bevorzuge die runde Seite oben.

6. Jetzt kommen die Augen dran. Ich habe Knöpfe gewählt, da ich nicht besonders gut im Sticken bin. Aber gestickte Augen wären bestimmt auch toll. Man kann das "Schnittmuster" verwenden, um zu gucken wo der Knopf hin muss oder man legt sie einfach hin, wo sie gut ausschauen.

7. Die Elefanten dann rechts auf rechts zusammenstecken und drumherum nähen. Oben eine Öffnung von ungefähr 4-5cm lassen.
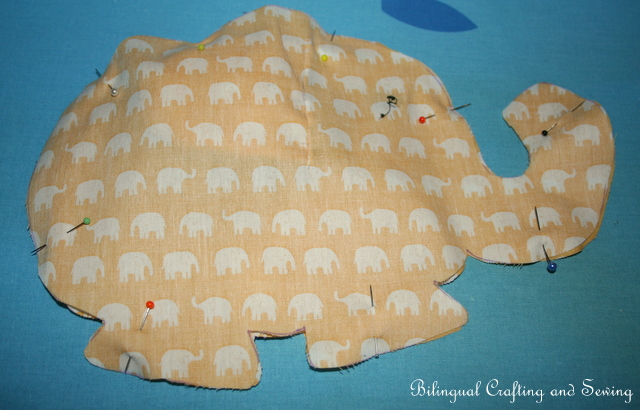
Wieder habe ich mit der Stoff-ZickZack Schere drumherum geschnitten, hauptsächlich um das aufribbeln des Stoffes zu vermeiden.

Aber bloß nicht zu nah an der Naht. Mir ist das des öfteren passiert und dann musste ich das wieder festnähen. Kein Spaß, besonder nicht beim Rüssel.
8. Nun umdrehen. Ich hab das mit dem nicht-spitzen Ende einer Stricknadel gemacht, es geht aber auch mit einem langen dünnen Pinsel oder einem Stift oder ähnliches... Dann fängt man an den Rüssel zu füllen, auch mit dem der nicht-spitzen Stricknadelseite. Immer nur mit ein wenig Wolle und die dann bis ganz nach hinten schieben. Nimmt man zu viel, wird der Rüssel am ende sehr steif. Dann füllt man den Rest auf. Wenn man dann fertig ist, näht man die Öffnung mit einem Leiterstich (man kann sich Youtube-Videos dazu ansehen, der Stich heißt aber auch Matrazenstich, Zaubernaht oder oder oder). Dann ist man fertig und man hat einen tollen neuen Freund.


Wie immer, hoffe ich es hat euch gefallen und ihr seid inspiriert euren eigenen Elefanten zu machen. Ich würde es absolut FABULÖS finden, wenn ihr ein Leser durch RSS, GFC oder Email werdet. Und wenn ihr den Elefanten macht, dann wäre Feedback auch ganz toll und wenn ihr euren Elefanten herzeigen wollt, dann sagts mir. Wenn nämlich jmd. interessiert ist, würde ich eine Flickr-Gruppe aufmachen oder so.

P.S. Ich kann dieses Stofftier nicht für Kinder empfehlen, wegen verschluckbarer Kleinteile.

today I'd like to share an elephant-softie I've made. The idea came to me last year, when I made the Sweet Scallops Tote from Kate at Sew Kate Sew. I had this wonderful yellow elephant fabric left over. It wasn't very much and I thought about things I could make with it... And what is better than to make an elephant out of elephant fabric?
So now - months later - I've actually came around to do it. I made my own pattern, although I found those lovely elephants by Jess from Craftiness Is Not Optional. I could've used that pattern, but I wanted mine to be not quite as skinny. Does that make me a weird person? Aaaaanyway, here is my little bilingual herd of elephants:
And I actually want to share how to make these with you.
What you'll need:
- main fabric (about a 1/4 of a yard)
- coordinating fabric for the ears (a scrap would be enough)
- two buttons or embroidery fabric (for the eyes)
- polyester toy filling
- sewing supplies (such as thread, sewing maching, pins, etc.)
- iron and board
- pattern (found here)
See how the elephants look in different directions. You need that. Cut them out. You'll end up with two elephant-pieces and four ear-pieces.
2. Then take the ear pieces and iron over 7mm (this is about 1/3 of an inch).
That piece of thick paper helps me with this. It has a line at the 7mm. And I just aligned the fabric with the line and ironed it over. This is common technique, unfortunately I can't remember, where I got it from.
With right sides together pin two of the ear-pieces (two different fabric-ears), so the top edges align perfectly with each other.
I know it doesn't look like they align in this picture, but I assure you, they do. I took several pictures and in all of them they look not aligned. I wonder why that is, except maybe that I have no clue about photography.
3. Sew around the curved edge and also make notches in the curve or cut with pinking shears around it.
I did this not just to get rid of the bulk, but because I noticed that the fabrics frayed and I want this to hold for awhile. Turn it, iron it and start filling them with the polyester filling. Not too much and you'll not want it to be too close to the edge. Push it a little less than half an inch inside the ear.
3. Now pin the straight edges together again so they align and then put the small ear pattern on top of the ear and draw a line around it. You'll want to do this with chalk or those purple pens that disappear. I have one that has a white tip on its other end and when you go over a purple line with it, it will disappear. When I first made elephants out of cheap white fabric, I kind of eyeballed this and it worked just as well. So if you aren't sure your line will disappear or you don't have anything that works, just go ahead and eyeball it. The charm of those elephants is that they aren't too perfect. ;o) Then sew around the line you drew. The straight edge stays open. Repeat this with the other ear, as well.
4. Take your elephant pieces and mark where that long line on the elephant.
It doesn't need to be all of the line.
5. Pin one of the ears on top of one of the elephants. You can choose, which ear you like better on which side. You'll notice that one of the round edges is more rounded than the other. I personally want the rounder edge on top. Now sew it on really close to the straight edge. Repeat on the other elephant-piece
6. Now is the time to sew on the buttons. Since I don't embroider, I chose buttons, but embroidered eyes are great, too. I eye-balled where I wanted the eyes to go, but you could use the pattern to mark the spot.
7. Pin the elephant right side together and sew around them, leaving an opening of maybe 2-3 inches on top of the elephant.
Again, I cut around it with my pinking shears to get rid of bulk and most importantly to prevent too much fraying.
But be careful not to cut too close to the stitching. I had cut too close several times and had to go back an restitch it. Not fun...
8. Now turn it around. I used the not pointy end of a knitting needle, but a long thin brush or something similar will do the trick. Then start by filling the trunk with a small amount pushing it down the end, than another small amount of filling and so on until it is filled up. This is the best way, if you take to much you will push it all into the end of the trunk and you'll end up with a super stiff trunk. Then start filling the rest up. When you're done, close the elephant with a ladder stitch (you can watch How-Tos on youtube, the stitch has several names, it's also referred as a magic stitch or matress stitch) and enjoy your new little friend.
So, as always, I hope you enjoyed my post and are inspired to do make your own elephant. I would absolutely LOVE if you would become a follower or subscribe through RSS or via email. Also if you use this tutorial, I would love some feed-back and if you want to share your elephant, just tell me. If anyone is interested, I'll open a flickr-group or something like that.
P.S. I do not recommend this toy for children! There are small objects that children could choke on.
These elephants are so cute! I like how they can be placed with intertwining trunks. How nice that you did all of the work to provide this tutorial in two languages!
AntwortenLöschenThese are so adorable!!! I love the way you made the ears for the elephants! Thanks for sharing this on the Take it on Tuesday blog hop! I'm definitely pinning these!!
AntwortenLöschenSimply adorable.
AntwortenLöschenThese are perfect1 I LOVE them! I am having a Make a Gift on the 25th Party on Blissful and Domestic. I would LOVE for you to link this up,. It makes for a great gift idea too!
AntwortenLöschenhttp://blissfulanddomestic.blogspot.com/2012/01/make-gift-on-25th-christmas-leg-warmers.html
Your elephants are adorable! Elephants are my daughter's favorite. I'm thinking I need to make her one! I found you through Romance on a Dime. Thanks for sharing! I love your blog name, by the way.
AntwortenLöschenThey look so adorable !
AntwortenLöschenThese elephants are adorable. Thank you for the tutorial.
AntwortenLöschenToo cute!! My son would love them. Thanks so much for sharing at our Shine on Fridays party!
AntwortenLöschenSo cute.. Love these.. Thanks for linking!
AntwortenLöschenI am going to featuring you tomorrow afternoon:> Thanks so much for linking up to Making a Gift on the 25th.
AntwortenLöschenhttp://blissfulanddomestic.blogspot.com/search/label/Make%20a%20Gift%20on%20the%2025th