Samstag, 24. Dezember 2011

Days 20 - 24


Heute gibt's den letzten Post vom Advent.... Traurig, aber wahr! Also los geht's:

Tag 20

Das ist ein kleiner süßer Hut für ihren Kostüm-Koffer. Er kommt von einer meiner Lieblingsblogs 
Fleece Fun.  Sie haben so viele tolle Ideen und Schnittmuster. Allerdings habe ich nicht ihr Schnittmuster benutzt. Ich hatte wirklich dicken Filz vom Tag 18 übrig und habe einfach zwei kreise und ein Rechteck ausgeschnitten. Verziert hab ich den Hut mit Federn und die kleinen falschen Edelsteine kommen von 1-€ Billig-Ohrringen.


Tag 21
 

Noch ein gekauftes Geschenk. Das hat die andere Tante von meiner Nichte gekauft. Es ist ein kleiner Eierbecher von WMF. Er kommt mit einem kleinen Löffel und einem kleinen Hammer mit dem das Ei kaputt hauen kann. S-Ü-ß, gell?


Tag 22

Nummer 22 ist auch gekauft. Meine Nichte liebt Knicklichter und beim Müller - Drogeriemarkt habe ich doch tatsächlich Knicklichter-Ohrringe gefunden. Yay, die sind so toll und wirklich billig. Ich glaube, ich glaube ich habe ca. 1,50€ dafür gezahlt.


Tag 23

Auch wieder von Fleece Fun kommt dieser echt süße Rotkäppchen-Umhang. Es war wirklich nicht schwer und was rausmkommt ist wirklich toll.


Tag 24

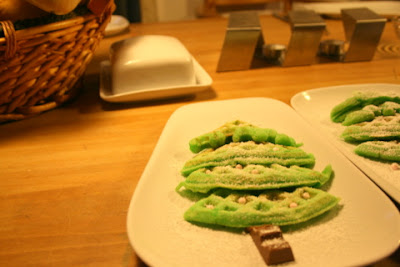
Also ich habe mir gedacht, dass es schön wäre am letzten Tag etwas zu haben, was die ganze Familie genießen kann. Also gibt es Tannenbaum-Waffeln. In das Eimerchen habe ich eine kleine Notiz, die ihr sagt, dass sie eine Überraschung bekommt, wenn jeder fürs Frühstück da ist..

Die habe ich von hier. Sind sie nicht toll? Ich liebe sie. Hier ist ein Bild von meinen. Da ich Speck wirklich nicht leiden kann, habe ich den weggelassen, genauso wie die frischen Beeren. Wären zwar toll, aber ich würde Beeren nur zu ihrer Saison kaufen. Also habe ich einfach den Speck durch Schokolade ersetzt und Zuckerperlen aus Weihnachtsbaumkugeln drauf.


Und dieses Photo hat meine Nichte gemacht.


Fröhliche Weihnachten und besinnliche Tage.


This is the last post about the Advent - Calender.... Sad, right?
Well, let's start:
Day 20

This is a little fancy hat for the costume-suitcase. It's from one of my favorite blogs Fleece Fun. They have so many great ideas. Though I have to admit, that I didn't use their pattern. I had really thick black felt left over from the witch hat from Day 18 and I just cut out two circles and a square from that. I embellished it with feathers and the little sprakly things are from cheap dollar-store earrings.


Day 21
 

Another store-bought present. My niece's other aunt bought that for her. It's a little pink egg cup, it comes with a spoon and a little hammer to break the egg with... Yes, I know A-D-O-R-A-B-L-E!


Day 22

22 is again store bought... She loves those lights, that you have to bend to break a little piece in it, so the two fluids inside can mix and they start glowing. And then I found glowing earrings... OMG, they are AWESOME!


Day 23

Again, from Fleece Fun is this really cute "Little Red Riding Hood" - Cape. It was easy enough and the outcome is gorgeous.


Day 24

So I thought the last day should be something my whole family enjoys. So I made Christmas Waffles this morning. She found a little note inside Number 24 telling her that I had a surprise for her, if everyone's downstairs for breaktfast.


I found the idea here. Isn't it awesome. I love them. Here is a picture of mine. Since I positively HATE bavon and fresh berries aren't in season here. I left the bacon and added a piece of chocolate for the trunk and pink sugarpearls as ornaments.


And this picture was taken by my niece.


Merry Christmas and enjoy the holidays.


Mittwoch, 21. Dezember 2011

Christmas Gifts - Weihnachtsgeschenke

So, of course, I had to make at least for one person in my life, a homemade gift or better gifts. And this year, my best friend is the lucky one! ;o)

Gift #1:
First, I made her a reversible tote using this tutorial. But I did not use patterned fabric on both sides. One was a solid color, which I embellished with words.
Now it reads in glittery black:


On Pinterest I saw totes, shirts and all kinds of other stuff with this quote. I love it. I think it is hilarious. And I hope my best friend (one of the only people, who actually read this humble blog) likes it as well.
I made it using the technique explained in this video. I wish I owned a silhouette to cut out vinyl letters for stenciling. It would've been neater and cleaner. But one day I'll own one of these.... I love them, the possibilities are endless.
Anyway, the technique worked just fine. Here you can see some pictures of the process of making the tote.


This is the color I used for this project. I like it and I have TONS over, so I'm going to do some other things with that, as well. I'm thinking black on black might be something...


Of course, this kind of tote actually needs a book to go with. I bought a Nicholas Sparks Book... Have you read something from him? He's great. I hope she hasn't read it yet. I bought her the German version of "The Last Song"

Gift #2:
The second gift for her is a surprise ball. I found one on Pinterest and thought that they are great. Here you can see what I put into them...


1. Cute little bracelets
2. Earrings bought at small jewlery-shop in Nuremberg
3. A little bow book mark found here.
4. And little bars of chocolate

I made a couple of pictures, while making the ball, so you can see how I made it.


And here is the finished ball again, a little bigger:


Maybe you'll have some time to make one of these balls for someone before Christmas, they are really fun to make.
Have a fabulous day, I am going to the preview of the new Sherlock Holmes movie, now...
See ya...


Natürlich wollte ich natürlich wenigstens einer Person in meinem Leben ein selbstgemachten Geschenk oder besser Geschenke machen. Und meine beste Freundin ist die Glückliche heuer.

Geschenk #1:
Als erstes hab ich eine umdrehbare Tasche mit Hilfe dieses Tutorial gemacht. Auf der einen Seite habe ich allerdings kein gemusterten Stoff genommen, sondern einen unifarbenen. Den habe ich nämlich mit schwarzer Glitzerfarbe beschrieben:


Auf Pinterest habe ich viele Taschen, T-shirts und alle mögliche anderen Sachen mit diesem Spruch gesehen. Ich find ihn sehr lustig... Ich hoffe meine beste Freundin wird diesen Spruch auch sehr lustig finden.
Die Schrift habe ich mit Hilfe dieses Video gemacht. Ich wünschte, ich hätte eine Silhouette um eine Schablone auszuschneiden. Das hätte es wahrscheinlich ordentlicher und hübscher gemacht. Aber eines Tages werde ich so eine besitzen.
Ich finde aber es ist mir aber tortzdem ganz ordentlich gelungen.

Das ist die Farbe, die ich für dieses Projekt benutzt hab. Ich habe TONNEN übrig und ich werde damit eine Menge anstellen können. Momentan denke ich an schwarz auf schwarz...


Und hier sind ein paar Photos vom Prozess des Machens.


Natürlich braucht diese Tasche auch ein Buch dazu. Ich hab ihr ein Nicholas Sparks Buch gekauft. "Mit dir an meiner Seite" heißt es und ich hoffe, dass sie es noch nicht hat. Nicholas Sparks ist einfach unglaublich toll...

Geschenk #2:
Das zweite Geschenk ist ein Überraschungs-Geschenk. Die habe ich auf Pinterest gesehen. Hier kann man sehen, was so alles im Ball drin ist:


1. Armbänder
2. Ohrringe aus einem kleinen Schmuckladen in Nürnberg
3. Ein kleines Schleifchenlesezeichen hier.
4. und kleine Schokotäfelchen

Ich hab ein paar Photos während des Porzesses gemacht.


Und hier ist der fertige Ball noch etwas größer:


Vielleicht habt ihr ja noch Zeit selber so einen Ball zu machen, sie sind wirklich gut zu machen und sehen auch sehr lustig aus.
Einen fabulösen Tag, ich gehe jetzt in die Preview vom neuen Sherlock Holmes...
Bis denne...


Montag, 19. Dezember 2011

Day 15 through 19

Hallöchen, heute gibts Tag 15 bis 19.
Also die ersten 4 Tage gibt es ein Hexen-Kostüm.

 Tag 15

Das ein T-shirt mit umgekehrten Applikationen. Inspiriert dazu wurde ich von einem herz-förmigen gestreiften Herz, leider kann ich die Seite nicht mehr finden. Die Bloggerin hat ein großes Herz, ähnlich wie dem Stern unten rechts, gemacht. Wenn jemand was weiß, bitte melden. Ich würde sehr gern einen Link hier hinstellen.

VORDERSEITE
RÜCKSEITE

 Tag 16


Ich hab hier ein Hexen-Tütü gemacht, mit Hilfe des gleichen Tutorials, das ich auch schon für die Tütüs für den Geburtstag meiner Nichte benutzt habe.


Die Idee zum Hexen-Kostüm hab ich von hier.


Tag 17
 
Natürlich braucht auch jede Hexe einen Zauberstab und das hat ja mal so was von Spaß gemacht. Sie sind wirklcih leicht zu machen, leider ist das allerdings schon der Dritte, den ich machen musste, weil die Farbe, die ich bei den ersten zwei benutzt habe, alt und schlecht war und deswegen nicht getrocknet ist.
Aber beim dritten Mal hat es geklappt.


Diese Zauberstäbe sind wirklich simpel. Alles was man braucht ist Papier, eine Heißklebepistole und etwas Farbe. Bei Instructables gibt es ein tolles Tutorial.


Tag 18


Das letzte Kostümteil ist der süßeste Hexen-Hut, den ich je gesehen habe. Eine Anleitung und das kostenlose Schnittmuster kann man bei Living with Punks finden. Süß oder? Meiner ist auch ziemlich gut geworden, finde ich.


Tag 19


Für heute habe ich ein Schneeman-Shirt gemacht. Das Tutorial gibt es hier. Ging wirklich schnell und einfach. Die Nase ist aus dem gleichen orangnen T-shirt gemacht, wie die Sterne vom Hexen-Shirt oben. Dieses alte T-shirt von meinen Vater, hat wirklich schon gut Anwendung gefunden, mal gucken was noch draus wird ;o).


So und schon aufgeregt, so kurz vor Weihnachten? Ich schon, denn ich bekomm eine neue Nähmaschine von meiner Mama und darauf freu ich mich schon ganz besonders.
Also schöne letzte Vor-Weihnachtswoche.


Today, I'll share days 15 through 19
So, first is a witch costume which is split into 4 days...
 Day 15

This is a shirt appliqued using the reverse applique-method I've seen on many blogs. I was especially inspired by a heart-applique tutorial, I really enjoyed. Unfortunately I cannot find it anymore. The blogger made a big striped heart similar to my star on the lower right corner. If you know what I mean or if you made that tutorial. Please comment or e-mail me. I feel bad for not linking back...

FRONT
BACK

 Day 16

I made a tutu for the witche's costume using the tutorial I already used for the tutu for my niece's birthday-party.
 I got the idea for a witche's tutu from here.


Day 17

Of course, every witch needs a wand and making this was SOOO much fun. It was really easy. Unfortunately I messed up twice, so this is actually my third one. I used old and bad acrylic paint on the first two and it didn't dry at all. But this one came out really good, I think.


These wands are so simple. All you need is paper, a hot glue gun and some paint. You can find a tutorial on Instructables.

Day 18


The last item for my little witch is the cutest witch-hat, I've ever seen. You can find the tutorial and pattern on Living with Punks. Isn't it cute? I think mine came out very good as well.


Day 19


For today I made a snowman-shirt. You can find the tutorial here. This is really quick and instantly super cute. I used reverse applique for the nose again, because I just had that old shirt and not some nice thick curduroy. I'm telling you, I'm getting a lot out of that old orange shirt from my father. I already used it for the witch-shirt above and now again....


So are you excited for Christmas, yet? I am, because I'm getting a new sewing machine from my mom and I am super excited about that...
Have a great week.


Print and PDF